M.A. Hochberg’s Technology for Teaching

Making technology easier for people

Monday
06/16/2008

2:16 pm

Tiny Books for Macs

Three of my favorite short (8 tiny pages) booklets are from Creative Techs in Seattle. I keep copies in my desk and briefcase, ready to hand out. All are available as free downloads. They are:

My Mac Won’t Start
http://www.creativetechs.com/iq/my_mac_wont_start.html

Mac OS X Shortcuts
http://www.creativetechs.com/iq/mac_os_x_shortcuts_pocketmod.html

My Mac Memory Book
http://www.creativetechs.com/iq/my_mac_memory_book.html

Monday
06/16/2008

1:59 pm

Ouch! Staples inside the iBook latch

Updating computers usually isn’t physically painful but today, I was stabbed by a staple that caught on the inside of an iBook’s magnetic catch. Most of the staple was inside the iBook casing, with only one metal leg showing, just enough to draw blood.

Both the  iBook and Powerbook have a metal latch sticking through the plastic of the case. While I have seen paper clips grabbed by the magnetic latches, this is the first time I have seen a staple that had worked its way to the inside of the latch.

Last century, we had to keep magnetics away from our computers. It looks like this century, we have to keep metal, especially small pieces of metal, away from the computer’s magnets.

Wednesday
06/11/2008

1:56 pm

Finder Settings for Student Computers

These are for OS 10.3 and 10.4. Staff settings are almost identical. For those computers, skip the first item: “uncheck Hard disks.”

In Finder Preferences,
General: uncheck “Hard disks”
Sidebar: only these should be checked
Hard disks
Connected servers
Removable media
Desktop
Home
Applications
Advanced: all should be unchecked

From the Finder menu
Go to View/Show View Options
Check “Show icon preview”

Friday
06/06/2008

2:08 pm

Checklist of problem solvers

When a Mac has problems, especially erratic problems, here’s some of the things I try:

Start in Safe Mode:
Press Shift/Power Button; let go when you see the spinning gears icon.
This forces a directory check and takes a while.
Once you see the sign on menu, click the restart button.

Start in Single-User Mode:
Press Command(Apple)/S/Power Button. Don’t panic.
You will see a black screen with white text.
Type fsck -fy and press return.
When the new message stops, look for “File System was modified.”
If you see it, type fsck -fy again and wait.
Repeat until you see the message “no problems found.”
Type “reboot” and press return.
The computer should start normally.

Zap the PRAM
Shut down the computer.
Hold down the option/command/p/r buttons. Turn on the computer. (You can also press the power button and quickly press and hold the buttons.)
Keep holding the buttons down until you hear it chime and pause three times.
Let go.

Repair Permissions
Go to Utilities/Disk Utility and select the start up disk on the left.
On the tabs, click on First Aid.
At the bottom of the screen, click on “repair permissions.”
When it has finished running, repeat “repair permissions” until there are no permissions left to repair.
Note: In 10.3 (Panther), you may see the same set of permissions being repaired each time. This are known as “spurious permissions” and may be safely ignored. Check apple.com for more information on these.

Thursday
06/05/2008

3:27 pm

PhotoBooth without the countdown

Want to save 3 seconds every time you take photo with Photo Booth?

Hold down the Option key when you click the camera. Your picture will be taken immediately.

Thursday
05/22/2008

10:22 am

Is my COW, aka Wireless Point, working?

With five COWS in the building, it can be a challenge to keep everyone online and connected. Last week, a set of laptops could not connect to the COW/base station that was in the room with them. This week, a different set of laptops could connect when they were across the hall but not when they were next to the COW.

In the first case, there was a problem with the base station. In the second case, the Ethernet cable connecting to the COW was failing. Much like the first problem, it was intermittent, making it even harder to track down the problem.

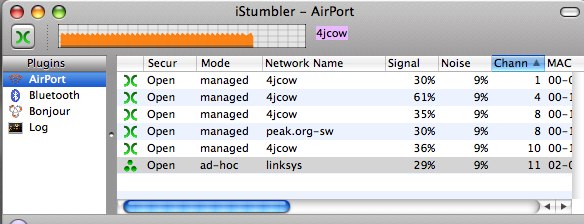
Two tools helped me to figure out what was going on. The first was iStumbler,

http://www.istumbler.net/

“A free, open source tool for finding wireless networks and devices with an AirPort or Bluetooth equipped Macintosh.”

iStumbler Screen

The second tool was the list of Mac addresses for the COWs. If my laptop is next to a connected COW but it doesn’t show up on the iStumbler list, I know that problem is there.

To see which COW a laptop is connected to, click on the Airport icon on the top menu, then click on “Open Internet Connect.” At the bottom of the window, look for the Base Station ID. Match that to your list of COW base station addresses and you know which COW you are using.

Thanks, Steve, for the list of Base Station IDs.

Friday
05/16/2008

3:24 pm

Full Date on the Mac Menu Bar

One of my pet peeves was that there was no way to add the calendar date on the menu bar. I finally found a way to do that without adding another program to my computer. Note: This works on 10.4 or later only.
http://lifehacker.com/software/mac-tip/display-the-date-on-the-menubar-316029.php

The directions are fairly clear but here are a few more tips.

  • You can insert the date before or after the time.
  • You can add spaces or ascii characters around either the date or time. I added a couple spaces between the date and time and added square brackets around the date. This improves the readability. Mine looks like this:

Menu Bar Date and Time

  • It took a couple of tries to get it looking the way I liked it. Each time I made a change, however, I had to go back to the Date & Time in System Preferences and uncheck “Show Day of the Week”.

I think I will include this hack in the next golden images that I make. This should save a lot of “What’s today’s date?” questions from students.

Friday
05/16/2008

9:44 am

“Peer to Peer File Sharing”

We recently had a problem with file-sharing on our network. After we resolved the problem, I sent out a message reminding staff members not to do peer to peer file sharing.

Here’s the message that I sent:

Peer-to-peer file sharing is not allowed on 4J computers or on personal computers using the 4J network. This includes programs such as Limewire, Bit Torrent, etc. Due to copyright violations, security issues and bandwidth issues, sharing should not be turned on.

You can have any of the programs on your computer, even Limewire, etc. You just can’t have them sharing files from the 4J network.

iTunes and iPhoto must have file-sharing turned off. (I make sure that it is turned off when I set up the computers.)

If you turn on file-sharing when your computer is at home, you must turn it off before the computer returns to school.

If your computer is sharing files, it can be permanently blocked from using the 4J network.

The complete district policy is at
http://www.4j.lane.edu/cis/appropriate_use

If you have any questions or concerns, please let me know.

~~~~~

Someone later asked me what “peer to peer file sharing” meant. Here’s my reply:

“Peer-to- peer” means the same thing in computers as it does with students: students who help other students are often called “peer helpers.” With computers, it means that one computer is helping (or passing information) to directly to another computer. No computer server (or teacher) is involved.

While the process itself is legal, it is often used to illegally copy music, movies, etc., to someone else. It also uses up a lot of the network’s capacity to send information. That means when someone is doing peer-to-peer file sharing with their computer, it slows down everyone else’s access to check their email, go on the Internet, or print.

~~~~

The bottom line? If you don’t know, ASK!

Thank you, Mary F, for asking me what “peer to peer file sharing” means.
Friday
05/09/2008

1:13 pm

What to do with your blog?

One of the best summaries of what to do with your blog is from another blogger, of course. Here is my favorite article. It is by Lorelle of WordPress, the company that makes this blogging tool.

http://lorelle.wordpress.com/2006/07/29/what-do-i-do-with-my-new-wordpresscom-blog/

Happy Blogging!

Thursday
05/08/2008

5:33 pm

Using iMic and Final Vinyl to transfer cassettes to CD

There are lots of programs and tools to capture sound from your computer and transfer it to another format. In this case, an iMic and Final Vinyl software made it quick and easy. Inserting tracks and burning the final result to a CD went quickly and smoothly.

The costs were right too. An iMic runs about $40, the software was free (Final Vinyl for Macs and Audacity for Windows or Mac), and a connecting cable was all that was needed. That and a lot of time.

Setting up the equipment for transfer doesn’t take long. After the initial setup is done, you need to do is adjust the sound levels and push record.

Once the tape is transferred, the next step is to add track markers. You can let the software do the work or put them in yourself. If you want track names, then those have to be typed in when you save the finished capture.

The final step is to drag the sound files into iTunes, putting them in a playlist, and burning them to CD.

A little time consuming but well worth it for those precious, fragile cassette tapes and LPs.