
Assignment #2- 123d 3D Design Application- Luminaire (printed)
Students will be introduced to the Luminaire project in a class demonstration, then follow example on video and in class demo to complete the assignment. Students may consult each other in small groups while completing this project. Note: 1. Must build a small platform/base at 5-8mm thick. 2. Must find a suitable pattern to subtract out for the sides. Students will export their finished luminaire as an .stl file and put the in the printer queue for printing. Screen shots (at least 2 perspectives) will be included in their ePortfolio assignment page, along with 2 pictures of the printed piece. Estimated time to completion – 2-4 class sessions. A comprehensive step by step tutorial link to complete the assignment is below.
Luminaire Example (Midway through video – can substitute “follow me” inner/outer layers, using sphere and shell tool (inner) to 3-4mm)
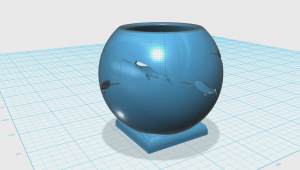

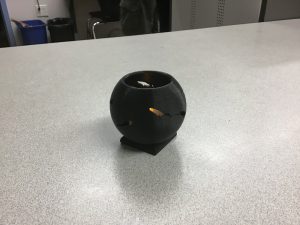
This assignment, (the 123D Design Application) was assigned to focus on creativity, effort, demonstrating good work, and listening and following the steps and directions while designing. The steps included building a small platform/base, finding a suitable pattern to subtract out of the sides, exporting the finished Luminaire as an .stl file and putting it on the printer for printing. I focused on creativity, effort, demonstrating good work, and listening and following the steps and directions while designing. I built a small platform/base, found a suitable pattern (a narwhal) to subtract out of the sides, exported my finished Luminaire as an .stl file and put it on the printer to print. I then took 2 screen shots of my designed Luminaire along with 2 pictures of the printed version. I completed this assignment with ease and efficiency. I had trouble at times but strongly enjoyed the process and would love to 3d design again.