A Number is not a Name – How to Name a Computer for People to Use
The upcoming changes to the way we manage and image our student computers offers a lot of challenges and changes. One change that is great for identifying computers but not so good for day-to-day use is having the computer’s name be the computer’s serial number.
Just as we humans have numbers, legal names, & preferred names, so can our computers.
Here’s what we will be doing at Meadowlark & Buena Vista Schools.
The computer’s “legal” name will, of course, be the serial number. That is what will show up on the log in window and in ARD as the “Computer Name.”
Our computers are already labeled with a name that identifies which one and where it is. For example, classroom computers are labeled & named
Room 9_1
Room 9_2
and laptops named
ML Blue Cow 10
ML Blue Cow 11
This tells me where the computer is and which one it is. Since the slots on the COWs are also labeled, it tells students where to return the laptop. This helps them identify which is their usual computer. “I use #12 on the Blue COW & #24 on the Red COW.”
(It would be nice if they had the same number on each COW but not all our COWs have a class set of laptops.)
With the upcoming change to the serial number for computer name, how can I quickly identify a computer with ARD 3?
Here’s the solution we will be using.
In System Preferences/Sharing/Remote Management/Computer Settings are four fields. We have been using three of them. Now we will use another field for our computer’s “preferred name.” Here’s an example.
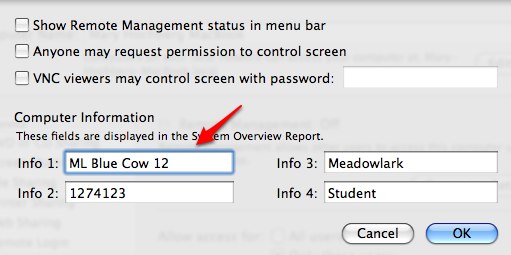
We currently use Info 2 for the Eugene School District inventory tag number. Info 3 shows which school owns the computer (our lab & library computers are shared by both schools but owned separately.) Info 4 shows whether it is a staff or student computer.
This does require minor editing after a computer is imaged but our past images already included info 3 & 4 and part of 2. Future images would have “ML Blue Cow ” in Info 1 so all I would have to add is the ending number.
How will this help in ARD? The main ARD window allows you to add all four fields to the selected columns. (Control/click at the top of any column) You can even rearrange the columns to suit you. I put Info 1 field next to the “Computer Name” column.
Now when a student calls to tell you that computer #3 in room 18 needs help, you can spot it quickly in ARD.